http://www.themodernquiltguild.com/

Monday, July 16, 2012

I ATE, I SLEPT, I STITCHED AND STITCHED

This was Red Rooster Retreat Weekend again.  This retreat is in Cullman, Alabama in a very rural setting with beautiful vistas of the Smith Lake.  I like to just settle in and quilt my heart out for four wonderful days.


What an awesome group of ladies to spend a weekend with -quilting and building friendships.


 Just look at some of the projects that were finished while we were at Retreat.  The completed projects are stacked 2 and 3 deep along that rail.

I was pleased with my progress on my Lemonade Stand.  The part I completed is the center of the quilt.  I will add the borders of the yellows and then another border of the teal.

The next project I worked on was my Farmer's Market Quilt that is made up of Lady of the Lake blocks.  I had to stop when I realized I did not bring all of the fabric I needed to complete the eggplant blocks.

This is the hand sewing corner of the work room at Red Rooster.  Here are Ava, Joan, and Libby working on projects. 


 I worked on my hand quilted sofa quilt.


Details of the quilting in one block.

My other hand stitching project was to get some more hexies together for my Star Quilt.


On Saturday morning I decided to make a Wave Table Runner out of Batiks.


These are the greens that I chose and then I added the contrasting bias binding.
I learned a new technique for making bias binding by starting with a square and folding all the corners to the center.

After folding I began cutting my 2 inch strips that would separate the different waves on my project.


This makes a lot of strips.


I ended up with this huge pile of strips to be sewn end to end.


I put the bias on one side of the strata sets. 

Then I sewed it to the other side and echo quilted as I went.
Detail of the echo quilting.

I like it better as a wall hanging instead of a table runner.

I did not do any work on my July WIP - the Convergence in Music- because I did not take enough fabric.

I am having withdrawal today after spending 4 days quilting, chatting, learning, and eating.  I did not have to prepare a single meal, nor did I have to wash my dishes. 

This was just a little Heaven on Earth.  Can hardly wait until next time.

                                             -sandi


Tuesday, July 10, 2012

EAT, SLEEP, STITCH

I love this shirt and I have adopted this as my motto.   You can find it over at Beth Gilbert's site:    http://www.bethsneedlenest.com/.   

I am headed out to Retreat again this week.  I don't usually go 2 months in a row, but I was given the opportunity --  so what could I say?   YES, YES, YES!!!

I am taking lots of projects with me.  Not sure what I will get finished.  Of course I will be taking this month's WIP with me.


Then  I have others I am working on and some I will start as new projects.


This is a Bonnie Hunter pattern "Lady of the Lake".  Maybe I will use it as a leader/ender.

Batiks to make a table runner for my dining room.

Of course, a hand project.  This is a red/white/blue flag wall hanging.  Maybe I will have it ready for next year's Fourth of July.


My version of Espresso Junction.  I am excited to get this project underway.  I want to see how changing to a light colorway will evolve.

Not sure if this is all I will be taking, but at least it is a start.  I may add another project or two.  After all, I have three days to sew, sew, sew.  Lots can happen in three days!

-sandi


Monday, July 9, 2012

TIP OF THE DAY

There is always a debate about whether to wash or not wash fabric before using it in a quilt.  For most of the time I am one of the "not wash" group.  However, when I use some fabrics that I have picked up at a yard sale or a flea market, I always want to wash them.  I like the stiffness and the finish that is evident on new fabric.  The sizing on the fabric makes it easier for me to get good cuts and have less stretch.

After washing fabric, all of the sizing is missing.  To regain that texture and feel,  I started using spray starch.  At first I used regular spray starch until I discovered Faultless MAXX.  I started using it and loved how it worked.   Next came another product called Best Press and I tried it.  I liked it for some projects but it was not strong enough to give the finish I truly wanted.  But it did have this very nice aroma.


  I like the heavy duty stiffness of MAXX and I love the aroma of Best Press.

Both of these products are costly and I use them liberally. I wanted to see if I could find something that would be a little better for my budget. 

I found a "recipe" on line to make my own spray starch.  It called for several ingredients and I decided that I could alter that and come up with something that would work for my projects and have fewer ingredients.  After a good bit of experimenting I found what I was looking for.

I like a pump spray instead of an aerosol spray so I saved my container from MAXX and chose to use it for refills of my "home brew" starch.


I use equal parts of Febreze Extra Strength liquid and Sta-Flo Liquid Starch.  Of course, if you like a less stiff starch you could use less starch and more Febreze.

I get the best qualities of each product:  the heavy starch and the lovely aroma. 
I mix the ingredients well and then pour them into my empty MAXX bottle and I am ready to start my next project.

Making my own starch is so much better for my budget and I just like the feeling of "homemade".

-sandi

Thursday, July 5, 2012

BRIGHT LIGHTS

The past year has been very busy for me.  I have completed more than 15 of my own projects and I agreed to teach another beginning level quilt class.  The year before I had officially retired from doing long term classes. I now limit my teaching to Workshops and Retreats. 

However, last fall I agreed to teach a quilting class to a group that gathers at one of the local churches.  This program includes studio time and classes in art, knitting, mah jong, doll making, and card playing as well as quiltmaking.  It is a senior adult program called Living is for Everyone  --   L.I.F.E. for short.

Ladies have been gathering for a number of years to learn quilting techniques and to make a small project or two.  This past year the director wanted a teacher to come in to teach a true beginning level quiltmaking course.  That is where I came into the picture.  I agreed to do this class which had three sessions of 8 weeks each for a total of 24 weeks.  The class met weekly for 3 hours to work on the project.  Many students wanted to do most of the project during class time.  Some others chose to work on it more at home.  For those who worked faster they had more studio time to do other projects.

I chose a Bonnie Hunter pattern called Christmas Lights. It is a free pattern offered on Bonnie's Website    http://www.quiltville.com/

Bonnie offered this quilt pattern using Christmas fabrics.  I chose to stay in the color families she used but not to use Christmas fabrics, so I called this project "Bright Lights".

Our first session was devoted to discussing the pattern and showing the finished quilt so the ladies would know how to choose the fabrics that were needed for the quilt.  We would make this quilt top during the first two sessions and the third session was designed to teach the final steps of making the quilt sandwich, pin basting, quilting the project, and adding the label.


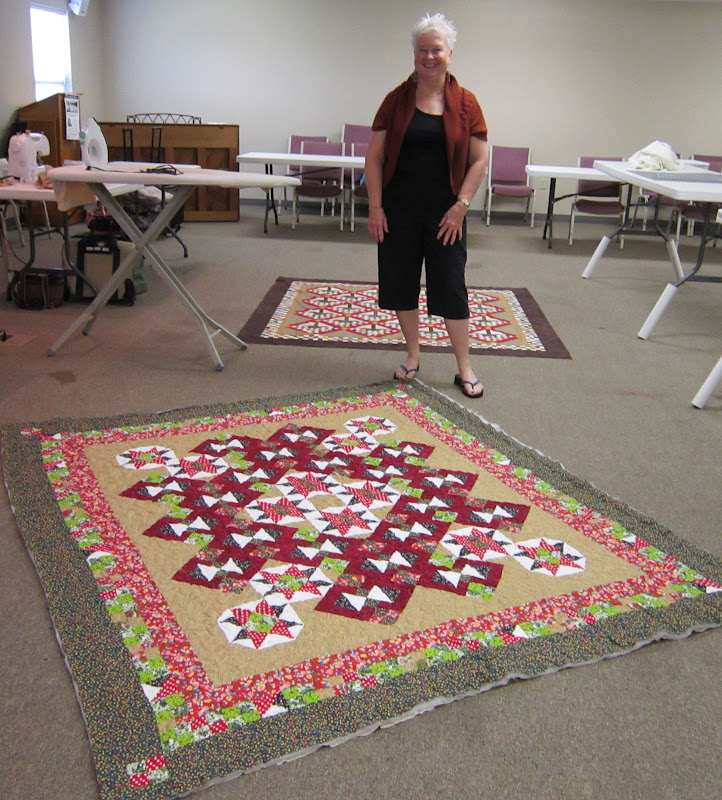
This is my sample quilt for them to see how each fabric was used.


Barbara did a very good job with her quilt.  It was fun for them to learn to use any ole' fabric to make the 4-patches and the quilt would turn out beautiful.

This is Jane's top before she quilted it.  Jane used a blue fabric with a very light yellow.

This is a picture of Jane with a studio project that I am answering a question for her and Ruth and Phyllis are listening to the "teachable moment".

Lots of discussion goes on when a student brings in a project that she needs ideas for how to set it or sash it.

Examples of other studio projects from the students.


Ruth chose purple shades and peach shades to do her quilt which she named "Night Lights".  Using the black as her neutral made quite a statement.


Robbie and Ann making pictures of the quilts at Show and Tell. 
Robbie chose another layout for her quilt and added some sashing.  Her inner pieced border is set on the diagonal.  Interesting, isn't it?

 Look at these beautiful blocks set in black and using the purple and the peach.  Yummy!  Check out her small inner border, then her black border with cornerstone before she added her pieced border.

Ann used a different inner border by interspersing some of the quilt block components with the black and white. 

Sally completed her class project before Christmas break in a baby size.  She gave it as a gift and I am sorry I did not have my camera that day to capture it in picture. 
She brought these Double Wedding Ring blocks to class one day and wanted to know how to use them.  These were all she had.  I suggested she do something a little contemporary with them by using some 30s reproduction fabric and not try to duplicate the original blocks.  I think this turned out stunningly.

This is a Tribeca Star pattern that Ruth was using for another studio project.
Glenda's "Bright Lights" turned out beautifully!  Let me just tell you that this is Glenda's FIRST QUILT ever.  I am so proud of her!

Phyllis chose to do some improvisation on her red alternate blocks by adding some sashing.  It makes the yellow stars truly float.

The tops were finally completed.  We had lots of discussion and demonstrations of backings.  Sometimes I showed them a back that was one solid fabric; other times I showed them how to make a pieced back with large squares of fabric; and then I showed them how to make a back with leftover blocks and components to make something rather contemporary looking.

This is the back of my sample "Bright Lights" quilt.  I must say that no one chose to do a back like this.  At least they know it is an option.  Even though most of the students wanted to take their quilts to a Longarm Quilter for finishing, we still practiced some straight line quilting and some free-motion quilting in class.  I brought some small pieces so they would not be nervous about ruining their best project.

This was a very extensive class with lots of questions and "teachable moments".  I was so very pleased with all of the students' projects!!!

Now for a little rest . . .

                                          -sandi

Tuesday, July 3, 2012

SUMMER READING


I love to read and my family and friends know this.  Often someone gives me a book or recommends a book for me to read.
My sister gave me a book that was written by Irene Latham.  Irene lives in Birmingham, Alabama and this is her first novel.  Leaving Gee's Bend is the story of Ludelphia Bennett set in 1932.  Although this is a book of fiction it tells a story of the Gee's Bend Quilters.  Latham based some of Ludelphia's adventures on the history of Gee's Bend, Alabama.  Ludelphia's adventures in this novel were written for children and it recently received the Alabama Library Association's 2011 Children's Book Award.  It is a very easy read and can be completed in a sitting or two.  I think you would enjoy the story of this sharecropper's struggle, as seen through the eyes of this young girl, and the eventual intervention of the Red Cross sending care packages that saved the destitute families.


My brother sent me a copy of Jennifer Chiaverini's latest book.  Chiaverini has written a series of books called The Elm Creek Quilts Novels.
I have read all of her books to date and find them very entertaining both for the story lines and the quilting stories. 
The Union Quilters is set in 1862 in Water's Ford, Pennsylvania.  It is a compelling story about the life of the men who served in the Civil War.  Behind the scenes of the war itself is the story of the Union Quilters who diligently made quilts and supplies for the troops.  In true Chiaverini style, this story holds you spellbound as the characters come alive and the reader shares in the joy, heartache, and love of these fine people in the Elm Creek Valley.


A former colleague of mine sent me an e-mail telling me about a book she had just read called The Half-Stitched Amish Quilting Club written by Wanda E. Brunstetter. 
A recently widowed Amish woman named Emma Yoder decides to offer quilting classes to help with her finances.  This will make it possible for her to be a bit more independent and able to take care of herself without burdening her children.  She has never done this kind of thing before but she strongly believes she has something more than just quilting to offer the students who come her way.  I don't want to spoil the story for you but I will mention that this group of adults are the most unlikely folks you will ever meet in a quilting class.  The stories of the students become interwoven as they share and accept each other.  Emma indeed has something besides quilting skills to offer this group of new quilters.  A super good read!

These are just three of my summer books.  What have you been reading?

-sandi

Monday, July 2, 2012

AND THE NUMBER IS . . .

Another WIP number has been chosen.  This time it is number 8.  The list in the binder identifies this project as Convergence in Music.  This little piece needs borders and quilting for completion.

Convergence in Music to be completed in July!

I think the challenge on this completion will be the quilting.  Want to do something creative on my domestic machine. 

Stay tuned!

                                    -sandi

Sunday, July 1, 2012

WIP # 1 FINISHED!


Contemporary Dresden Plate Quilt

On the first day of June, I had my DH choose a slip of paper from the bowl of all of these WIPs (Works in Progress).  This would be the project for the month to have finished by June 30.

The number he chose was #1 and this corresponded to the list in my binder.

#1 on the list was Dresden Plate.  I started working on it.

I took it with me to Retreat with my quilty buddies.

I worked on it diligently until I had the top finished.
I brought it home and started working on the back.  I wanted to use up all my 30s scraps.
I had some components left from making the Dresden Plates that I wanted to use up so I made the label from these.  The label tells the observer that this quilt was started two years ago with my friend, Linda Meck, who completed hers that first summer.

The original traditional pattern I started with called for 30 blocks to be set in straight set with sashing and 9-patch cornerstones.  After I made 15 of the Plate blocks, I decided I was finished with making Dresden Plates.
I still had all of the white squares that I cut to put the appliques on.  It seemed to me that I could use those and the 15 completed blocks I had and get that top finished.
I chose to set these on point simply to gain the extra inches to make the quilt a good sized twin.

I still had fabric left.  Since I had given up on a traditional setting I began to play with strata strips to make the borders.  I opted for borders only on 3 sides and one of those was one-third the width of the other two.
I liked all of the negative space that was left on this quilt.
It is quilted in an overall side to side pattern in medium density.
It is great to be able to say that the June WIP is now complete!!!

-sandi