http://www.themodernquiltguild.com/
Showing posts with label Improv quilts. Show all posts

Tuesday, September 22, 2015

FINDING MY VOICE, THREE

More quilts from Finding My Voice Exhibit at AQS QuiltWeek Chattanooga.




My Day of Sunshine
Needle Turn Applique
87.5" x 87.5"
Pattern by Jan Patek
Quilted by Jo McCluney
The featured technique is a combination of needle-turn applique and a little machine applique.  The entire quilt is done in Batiks.

Christmas Poinsettias
92" x 92"
Pattern by Bonnie Hunter
Quilted by Jo McCluney
The technique practiced in this mystery quilt pattern was working with the Easy Angle ruler to make half-square and quarter-square triangles.

First My Daughter, Now My Friend
64" x 80"
Pattern by Karen Combs
Quilted by Sandi Suggs
The design in this quilt was achieved with strong light/dark values in fabric.  This was the beginning of introducing some contemporary/modern designs to my quilts.

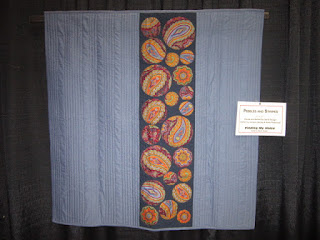
Pebbles and Stripes
37" x 37"
Pattern by Jacquie Gering and Katie Pedersen
Quilted by Sandi Suggs
With the discovery of the on-line Modern Quilt group, my interest shifted to a more modern approach to quilting.  Use of negative space, asymmetry in design, and straight-line quilting with some pebbles produced this piece.

Hear the Orcas Sing
89" x 97"
Pattern by Bonnie Hunter
Quilted by Jo McCluney
The use of black/white fabric for the background created a more interesting composition with the string blocks.  A new block in this quilt was Birds in the Air used in the border.

So, What's the Point?
Original Design by Sandi Suggs, Linda Smith, Sharon Joyner, and Karen Downer
Quilted by Sandi Suggs
This is a small modern improv piece done as a round robin with three friends.  One of my criteria was to "lose the points" on the stars.  It is straight-line quilted. 

Lemonade Stand
69" x 76.5"
Origin of pattern unknown
Quilted by Sandi Suggs
This is a fun two-color scrappy quilt using string piecing: stitch and flip corners; and strata blocks for the border.  The new technique was the stitch and flip corners tessellating to adjoining blocks..

-sandi


Tuesday, November 4, 2014

LIL BIT GETS A NEW QUILT!

LilBit likes to share the love seat with me when she has a snack or a treat bone.  Well, being the spoiled princess that she is, allows her the privilege of doing just that.  I put a quilt on the love seat to try to protect it from her food mess.  


This is a quilt I made using some of my step-out blocks from Snail's Trail Class that I taught a couple of years ago.


I decided that she needed a new quilt with a fall theme.  I had a bunch of strips left over from another project.  Imagine that!


I decided to play "What if . . ." and make improv blocks.  I started out making some wonky log cabin blocks.


What if...

I decided to use up more strips and make some strata blocks that I then cut to size to go with the wonky log cabins.


What if ...
I make a center block of dark strips.  Then cut these in half twice on the diagonal and re-sew into one 12 inch block.


Now what if....
I put these together into a 9-patch design???
I am not so sure the center block was effective, but it will remain.
What if I add a border,,, or not??

NOT!!!  This quilt did not need a border!  It was more interesting on its own.

Now for the quilting. . .

I love straight-line quilting.  On this quilt I chose to use simple flannel as my batting with a cotton backing so the quilt would launder and dry quickly and easily.  When I do straight-line quilting with regular batting I get a stronger texture than I got on this piece.

In two of the corners I chose to do rays.
I learned that it would have been better to originate my base on the opposite corner because the collection of threads in that upper right corner was tedious to say the least.  It was quite a build up and burying that many threads was a chore!

In the other two corners I chose to go back to working the stair step pattern.  I really like this pattern because a secondary texture usually develops at the intersection.


The secondary texture is not as evident here because of so many lines on the logs.


The strata blocks were quilted in sets of lines with a very organic feel to them.

And in the center I chose to do a spiral.  Again, lesson learned here was those blocks were way too busy for that design to show much.
Using all of these batiks made the pieces very busy and less clean looking.  I think this is still an example of a quilt with a modern aesthetic, but it would have been more interesting with less busy patterns on the fabrics.


This was a really fun practice piece and has turned into a cute little quilt for LilBit to snuggle into on the love seat.  It measures 36" square.


Here is a look at the quilt hanging up.


The indoor shot gives you a better perspective of size with it hanging over our fireplace.  The outdoor piece appears larger.


"Hey Mom, I love my new quilt.  Thanks", says LilBit.


                                                        -sandi


Saturday, March 1, 2014

WEEKLY UPDATE

Even though I set up a tentative list for completion this month, I seem to easily get off track. 

One of the projects I have done this week is a play quilt for a friend of mine who is going to be a first-time grandmother.  I like to make these little play mats that Grandmother can keep at her house for her precious bundle to lie on and eventually play on or be read to.


The Pineapple Workshop was a lot of fun. I had hoped to get back to it before the month ended, but that did not happen.  I will add it to next month's project list.

Pineapple Blocks Workshop used a ruler by Jean Ann Wright that makes it fast and easy.

I have seven blocks completed and I think I need a total of 16 to do a small wall hanging.  Of course, I want to do one for my daughter, too!! 
This will be a great leader/ender project as I work on other things that have deadlines.
 
Another project not on this month's list is the quilt I am making for my grandson.  I did add another round of the Courthouse Steps strips.  I have been using this project as a leader/ender for other projects.  This is now at a place to make it the primary project.


I also started a project that will be unveiled much later in the summer.  Here is a sneak peek at one of the blocks.


My Cascade Scarf is growing. .
 
I am working on three other projects that have deadlines for a special event and I cannot show them just yet!
 
LilBit is having a little slurp treat!!!
 
-sandi


Friday, January 17, 2014

IMPROV QUILT

Here are the fabrics I chose for my Improv Quilt.

My friend,  Denise, is teaching an Improv Class that she is calling Magic Numbers.  From all of the fabrics I am cutting several squares and rectangles of "magic" sizes:  3 1/2 inch squares; 3 1/2" by 6 1/2" rectangles and 6 1/2" by 12 1/2" rectangles.  After cutting these components I am using a design wall to "build" blocks.
This week's first blocks look like this:


Next week we are to start quilting them.  She has suggested some free motion quilting.  Hmmm, I am not sure about that.  I really do like the straight line quilting on my modern quilts.  Stay tuned.

                                              ~ sandi
 

Wednesday, January 8, 2014

NEW PROJECT

Fabrics collected for my Magic Numbers Quilt
A couple of my friends, Carol and Phyllis, are going to take a class with me that is being taught by another friend, Denise.  It is called "Magic Numbers Quilt" and it is a Modern, Improv, Quilt-as-you-Go quilt of any size you choose.  I am thinking I want mine to be queen size for my guest room bed.  We shall see if that is what I do. 

I have been collecting grey fabrics for a while to make a quilt for my guest room.  Here is the perfect opportunity. 

All of the fabric has been starched and ironed and ready to start.  This is an 8-week long class. 

Lots of talk has been going around about "low volume" quilts.  This will be my attempt at "low volume".

I will continually post as I progress through each class.

                                    -sandi

Monday, September 16, 2013

MAJOR MAKEOVER

I found this really neat old sewing rocker at a neighborhood yard sale.  I have had it for a few years and kept trying to decide how I wanted to re-do her.

She was pretty ratty looking . . .

Take a look at this seat cushion . . .
It is very water stained and paint splattered and faded out . . .

Today I decided to make a seat cushion cover. 

First I chose some bright fabrics to use.

Cut a bunch of strips in random sizes.
 
Now start sewing . . .
 
I am thinking Improv and Quilt As You Go.
I chose a variegated thread to use on the reds, oranges, and yellows.
I love this thread!  It has red/gold/orange/and pink. 

The other thread I chose is a rayon Madeira thread in a luscious green color.
 

Since I was going to do QAYG I chose to press the batting and the backing together so they would better adhere to each other.  I did not use a fusible batting, though.  I just wanted them to stick together by static cling.

I started by placing the first square off-center and then building it like a log cabin block and using straight line quilting all along the strips.

The seat cover is complete.  Now I will simply staple it onto the cushion frame.

The next step:  paint the rocker itself.  What color do I choose?  Black, Grey, White??

I finally settled on Black with a matte finish.  Actually, it was already in the cabinet in the garage and there were 3 full cans.  So, I thought, just use it!

Hubby suggested I put it up on the tailgate of his work truck.  He wasn't worried about any paint spray and there was no wind today.  That was a good thing. 

As you can see it is some bad shade of brown.

First coat of spray went on.

It is already looking good.  I am not very patient with spray paint and often get in such a hurry that I have runs.  Today I was going to be patient and diligent . . . so I decided to make the project not seem so long and drawn out, I cleaned my studio in between coats of paint.  That will be another post later.

She is finished and I love the paint job.  And no runs!!

Now on to getting the cushion put on.


We do not have an electric stapler so Hubby helped with getting the staples in the back.

Not such a pretty sight from this side . . .

However. . .

My improv seat cover.  I love it!

Now to put cushion and rocker together. . .


These first pictures were made outside and the sun was so bright it distorted the colors of the cushion.

Brought it inside to take another picture. . .

That is much better . . .


And this one is the best.  Lil Bit is not too sure about the rocking part of the rocking chair.  LOL  Just look at that mouth!!


                                                    -sandi