Foundation Paper Piecing is a wonderful technique for precise piecing. However, the tedium of ripping all the paper off the back when finished makes some of us opt out of using the technique.
I was excited to find a way to do Foundation Paper Piecing without sewing through the paper. Freezer paper is a notion that I keep in my sewing tool box for lots of uses. This time I am using it to create my foundation for paper piecing.
This is not intended to be a tutorial, but, rather, it is a series of pictures to show you how I paper piece.
The tools I begin with include the pattern, a postcard or two, a rotary cutter for paper and a rotary cutter for fabric, a ruler for straight edges.


I use freezer paper to make my patterns. First step is to create a sheet of freezer paper to run through the printer to copy the pattern onto. Iron a sheet of printer copy paper to the shiny side of freezer paper cut to the 8.5" x 11" size of printer paper. Take your paper piecing pattern to the copier and make the number of copies you need for your project.

 Tip: I mark the corner of the freezer
paper side with an X so that I load it correctly in my printer.
After I cut out my paper piecing pattern I am ready to start adding my fabric pieces to make the block.
 Press piece #1 onto the freezer paper side and lightly press. Turn back the pattern on the line between #1 and #2 and crease. I use a postcard to get a crisp crease. I use an Add-a-Quarter Ruler to trim off the fabric.
 Add fabric # 2 by lining it up with the edge of fabric #1 that you trimmed above and take the project to the sewing machine and stitch the first seam by stitching next to the paper and not through the paper.

This is the difference between the usual method. Stitch next to the paper.
After adding piece #2


I was excited to find a way to do Foundation Paper Piecing without sewing through the paper. Freezer paper is a notion that I keep in my sewing tool box for lots of uses. This time I am using it to create my foundation for paper piecing.
This is not intended to be a tutorial, but, rather, it is a series of pictures to show you how I paper piece.
The tools I begin with include the pattern, a postcard or two, a rotary cutter for paper and a rotary cutter for fabric, a ruler for straight edges.


I use freezer paper to make my patterns. First step is to create a sheet of freezer paper to run through the printer to copy the pattern onto. Iron a sheet of printer copy paper to the shiny side of freezer paper cut to the 8.5" x 11" size of printer paper. Take your paper piecing pattern to the copier and make the number of copies you need for your project.


paper side with an X so that I load it correctly in my printer.
After I cut out my paper piecing pattern I am ready to start adding my fabric pieces to make the block.


This is the difference between the usual method. Stitch next to the paper.
After adding piece #2

Open out the freezer paper pattern and fingerpress the added #2 piece. Take to the iron and press #2 piece to the freezer paper pattern.
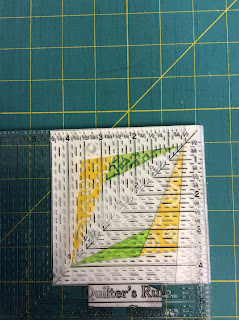
Continue adding pieces in order by number until you have finished the block.

Turn the block over and trim to size leaving a quarter inch all around.

Peel off the freezer paper and your block is ready to make your quilt.


Your freezer paper pattern is ready to use several more times to make the rest of your blocks. I can use one paper pattern at least 3 times.
I hope this has been helpful. If you have questions, leave a message in comment section and I will respond.

Credit for this pattern: Designed by Sylvia Schaefer at http://flyingparrotquilts.com
-sandi