http://www.themodernquiltguild.com/

Friday, December 16, 2016

NO-RIP FOUNDATION PAPER PIECING

Foundation Paper Piecing is a wonderful technique for precise piecing.  However, the tedium of ripping all the paper off the back when finished makes some of us opt out of using the technique.

I was excited to find a way to do Foundation Paper Piecing without sewing through the paper.  Freezer paper is a notion that I keep in my sewing tool box for lots of uses.  This time I am using it to create my foundation for paper piecing.

This is not intended to be a tutorial, but, rather, it is a series of pictures to show you how I paper piece.

The tools I begin with include the pattern, a postcard or two, a rotary cutter for paper and a rotary cutter for fabric, a ruler for straight edges.


I use freezer paper to make my patterns.  First step is to create a sheet of freezer paper to run through the printer to copy the pattern onto.  Iron a sheet of printer copy paper to the shiny side of freezer paper cut to the 8.5" x 11" size of printer paper. Take your paper piecing pattern to the copier and make the number of copies you need for your project.
         

                 Tip:  I mark the corner of the freezer

paper side with an X so that I load it correctly in my printer.

After I cut out my paper piecing pattern I am ready to start adding my fabric pieces to make the block.  


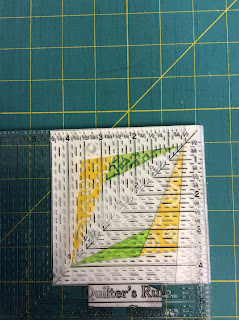
Press piece #1 onto the freezer paper side and lightly press.  Turn back the pattern on the line between #1 and #2 and crease. I use a postcard to get a crisp crease.  I use an Add-a-Quarter Ruler to trim off the fabric.  
Add fabric # 2 by lining it up with the edge of fabric #1 that you trimmed above and take the project to the sewing machine and stitch the first seam by stitching next to the paper and not through the paper.  


This is the difference between the usual method.  Stitch next to the paper.


After adding piece #2
Open out the freezer paper pattern and fingerpress the added #2 piece.  Take to the iron and press #2 piece to the freezer paper pattern.

Continue adding pieces in order by number until you have finished the block.

Turn the block over and trim to size leaving a quarter inch all around.

Peel  off the freezer paper and your block is ready to make your quilt.


Your freezer paper pattern is ready to use several more times to make the rest of your blocks.  I can use one paper pattern at least 3 times.
I hope this has been helpful.  If you have questions, leave a message in comment section and I will respond.


Credit for this pattern:  Designed by Sylvia Schaefer at http://flyingparrotquilts.com


-sandi

Saturday, October 15, 2016

SWEET IMPROV

It all started here.  I made this quilt as a birthday present for a special friend.  I still had lots of this fabric left so I decided to start an improv piece.

Need to get busy sewing bits together.

I have no specific design, it will be what it will be.
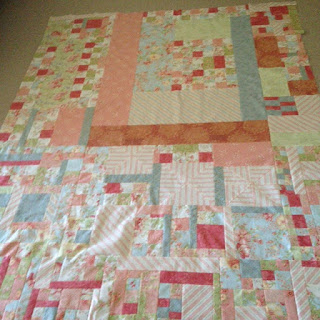
Okay, the top is together.  It is not completely square - yet.

Now to make a back and layer it for quilting.  I had planned to do QAYG but I started sewing units together and got carried away and finished the top.  Uh-oh, now I need to quilt the whole quilt.  

Definitely a project for the upcoming cooler weather.  I have a small stack of quilts still to be quilted.  
That means more posts to come.


-sandi

.


..

Wednesday, October 5, 2016

SOCKS AT LAST

I love to knit, but I don't do much of it.  Well, actually, I start a lot of projects but I don't always finish them.  

I first wrote about this project in a blog on February 2013.  I started knitting this pair of socks.


I was doing fine knitting the ribbing, then I reached a point with the heel and I was stuck.

They stayed at this place until about two months ago and I decided that I must finish them.  A friend offered to help me get past this obstacle.  She explained the pattern directions to me and I took off.

Now, three years later, here are my socks!!!


I love how well they fit and the contour of the toe area is marvelous!  They are so comfy!!!!

Yes, I have already started another pair!


-sandi

DRESDENS REVISITED


It started with this little kit from Susan G. Cleveland.


This is the first time I have made Dresden Plate blocks using Susan G. Cleveland's Prairie Pointer Tool.  Such a nifty little notion!


Chain piecing the spokes

Using the tool to get sharp points
After Pressing

Beautiful spokes for composition


I will be using this tool in other projects that I am designing.


                            -sandi


,

Tuesday, October 4, 2016

PLAYING WITH ABSTRACT QUILTS

I love travelling with my Hubs (a flea market picker) on the backroads of the countryside.  We come across a lot of interesting sights and I am always asking him to stop for me to get a photo.  I definitely had to stop for this Covered Bridge in Tannehill Valley, Alabama.


The covered bridge became the inspiration for doing an abstraction modern quilt.


This is the modern, simplistic rendition of the above covered bridge picture.
Since I wanted to make an abstraction from this I started cutting it up into small squares that I sewed back together.  


Now I have Abstraction # 3 and I love it.  The grid quilting gives it dimension.

This piece was inspired by the right side of the Covered Bridge where the support joins the roof line.  Abstraction #2.

A more realistic abstract was done using hand dyed fabrics from my stash.  Abstraction #1.

A detail of the quilting done on Bernina 640E machine.  I love straight lines.


                                              -sandi

Sunday, June 26, 2016

FAMILY TIES

This post is about quilting, but it is about a great deal more.  For many years, my hubs has been hoping to connect to his father and, possibly other siblings.  He never met his father and had only one photo of him.
Each time he thought he might have found his dad, he would re-think connecting with him for many reasons.  Among those reasons was his hesitancy to disrupt an established family who might not know that he existed.
A few months ago, through Facebook (don't we love FB?), he found a connection.  He discovered that his father had passed away a couple years prior, but there was a sibling.
After a good deal of communication, he felt like a meeting might be possible.

We took our vacation to Florida and hubs reached out to his sibling and we were able to have a wonderful lunch meeting.  The two of them instantly liked each other and three hours later, we left the restaurant.

Now, about the quilting . . .
Before vacation I was trying to put together a project for an upcoming Workshop I am teaching.  I kept looking for a traditional block that I could "modernize".  I came across a version of Dutchman's Puzzle in 5500 Quilt Block Designs  by Maggie Malone.  This block dates back to 1886 and I had seen it before but it never held my attention long enough to make it.  Somehow, this time I kept coming back to the block in the book.  I kept thinking there was another block for me to use.  But finally ...
I chose this block and cut my fabrics and started construction.

Now, for the interesting part. . .
Hubs discovered that his father was from Indonesia of Dutch heritage.   I had no idea that we would learn this about my hubs'  dad. 
As I was quilting my project, all of a sudden I had an Ah Ha moment.
I experienced a bit of chill bumps as I thought about the fact that I was working on a quilt pattern called "Dutchman's Puzzle" and my hubs just solved his Dutchman's Puzzle by meeting his sibling.

Thank you to my quilting muse for directing me to the "Dutchman's Puzzle Block" for my project.

My Dutchman's Puzzle Quilt is a tribute to Eric Spoelstra and John Spoelstra Suggs and their newly found family ties!!


                                    -sandi


Saturday, June 11, 2016

ABSTRACTION

INSPIRATION
Tannehill Valley, Alabama


Four of us signed up to do a program on Abstraction for our Chattanooga Modern Quilt Guild.

As we looked for inspiration this covered bridge became the picture we chose.  I was fascintated by some of the angular elements of the bridge and built my sketch piece from that.

My favorite part of this Covered Bridge is the support poles on each side of the opening and the "window openings" along the inside walls.

This is the first piece in this Abstraction process.


This was so much fun!!!  Will continue to play with this.


                                 -sandi


Wednesday, June 1, 2016

MORE MAY FINISHES

I have a large stack of quilts and quilt projects to be quilted.  This month is dedicated to getting many of them quilted.  They are all layered on my guest bed.


The first one to be finished is a small (16.5inches) piece that was appliqued using a back basting needleturn technique.  I love hand applique.


Another finish is my Thoroughly Modern Mini Swap quilt.  It is about 16 inches by 24 inches and has already gone to the recipient from the Memphis Modern Quilt Guild.

I worked on some alcohol ink jewelry pieces.  These are so fun and addictive.

It was fun to get some pillowslips made for my guest room that coordinated with my QAYG Quilt.


This month I have worked on several things but have not completed them, or, they are complete and I cannot show them until next month because they are part of a program for Chattanooga Modern Quilt Guild in June.

Here are a couple that I cannot show the front of yet.


Both of these pieces are abstract work.


Perhaps, I will make a bigger dent in that stack in June!


                                  -sandi


Monday, May 23, 2016

OOPS!

Sometimes I plan a project and think I have a real clear idea how it will go, then something happens.

Recently I did a Back Basting Needleturn Applique piece.  Pretty straightforward.  It was a basket with a couple flowers and a heart.

The first step is to trace the design on the wrong side of the foundation fabric.  I wish I had a picture to show you, but maybe I can explain it.  I laid my background fabric onto the light box and thought I had lined up my basket to fit diagonally from corner to opposite corner.  So I guess the fabric slipped or I moved the pattern.  Nevertheless, my drawing was not on a true diagonal.  It was a little skewed to one side.  

When it came time to square it up and add the finishing touches, there were some gaps along two corners.  Uh-oh!  So I had to get creative!

I simply decided to start adding borders and working to get it square.  I was really pleased with how it turned out.  You will note that the corners are not alike.


It is square but it gives an illusion of being a little off center.  I was able to take a very traditional pattern and turn it into a modern version.  
I faced the piece instead of adding a binding.  I am a happy camper!


                                     -sandi

Monday, May 16, 2016

2016 FIRST QUARTER FINISHES

This year I would like to do better at posting my finishes.  Below are a few things I finished in the First Quarter of the Year.  Let's see if I can do better with all of this.


JANUARY
Made a new cover for my daughter's vanity stool

A really nice lap quilt size
Snowflake QAL
Faith, Hope, Love Angels


FEBRUARY


Needle Case made from selvages

Needle Cases for Retreat Guests


                                                                MARCH
Modern Mini Swap
Mug Rug for my Modern Mini Swap


                                           -sandi