http://www.themodernquiltguild.com/

Thursday, December 31, 2015

LECTURES AND CLASSES AVAILABLE

Classes and lectures I will be offering in 2016.  If you are interested in scheduling a class or a lecture and a class please contact me at sandiqltr at epbfi dot com for details and fees.


DRUNKARD'S PATH TREES
MODERN DESIGN - DRUNKARD'S PATH
MODERN DESIGN PIXEL
MODERN DESIGN - STRAIGHT LINE QUILTING
WHICH WAY IS UP Half-square Triangles
PINEAPPLES ON POINT


QUILT AS YOU GO
QUILT AS YOU GO


Modern Design Quarter Log Cabin
MODERN - MATCHSTICK QUILTING


FLIP AND SEW QAYG
PIXEL LANDSCAPE QAYG


MODERN IMPROV 
WONKY LOG CABIN AND STRATA
MODERN DISAPPEARING 9-PATCH

Lectures:
"Let's Make it Modern"  One hour with examples
"Designing a Modern Quilt"  One hour with examples


                                  -sandi


Saturday, December 26, 2015

2015 In Review

A few of my quilts and quilt projects for 2015.

 A modern disappearing 9-Patch


                                                                                                                                                                                                     My Kona Solids Pixel


Original design using Quarter Log Cabin


 Half-square triangle blocks
Courthouse Steps Blocks called Texas Two Step

Lawn Chair Quilt


 Original Design sketch using Roy G. Biv colors
 Party Line Pattern designed by Jackie Cory

Prayer Flag


 Pineapple Blocks using Pineapple Trim 
Tool Ruler

Cute little pouch
Original design using HSTs and QSTs

 Having fun with Quick Curve Ruler by Jenny Pedigo
 Hexie mug rug with Big Stitch
Making mug rugs from selvages


Cute little triangle shaped pouch


                                        -sandi

Monday, November 30, 2015

SPRING GARDENS

The Chattanooga Modern Quilt Guild had a Design Series for programs in 2015.  One of the blocks we were introduced to was a quarter log cabin.  The leader/designer called it the "L" block.

I had yards of Kona Green Apple fabric and some wonderful text fabric, Sunkissed by Sweetwater for Moda.  These two together made a big statement.

I am a gardener of sorts . . .  I do like raised beds.

Here is "Spring Gardens" using the quarter log cabin and LOTS of negative space.  These are my raised beds.

Some details that you might like:

Must have sun rays to get the garden growing.

Different size and shapes of the raised beds with paths around.


Lots of straight line quilting gives texture and emphasizes the "beds".


And a little binding surprise!


This piece measures approximately 36" square.


-sandi

Saturday, November 14, 2015

SNOWFLAKE QUILT

I love Quilting Retreats.  It is a time to spend several days with no interruptions for home responsibilities.  Meals are planned and served and I don't have to do the clean up.  No laundry is staring me in the face.  And I can sew for hours and hours.

Each retreat presents me with the conundrum of what do I want to work on.  I always take more projects than I could possibly ever do in the period of time allotted.

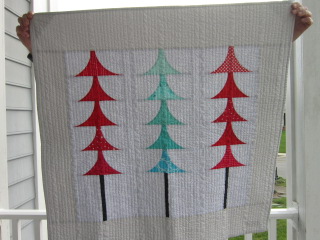
This past retreat came just in time for the Snowflake Quilt A Long from the Bernina USA blog page.  It was designed and written by Faith Jones of Fresh Lemons Quilts blog.  I love her work!

I cut all of my quilt pieces before I left so all I had to do was sew.  I finished the top while I was there and then got it quilted and bound within a couple days of coming home.

Here are the things I especially love about this quilt.  First of all, the combination of red and aqua with the silver background was just so wintry crisp.  It has no border and the blocks "float".
I quilted it in a medium meander with a silver thread.
The best part was the faux piping with binding that I added.  That was a super technique.

I will show you how I did that Faux Piping.  Some quilters call this a flange binding, but I think of flange as a different technique.

The first step is to cut the binding strips.  You need one fabric that will make the piping and the other fabric will be the contrast.

Cut the piping fabric at 1 3/4" wide and cut the contrast fabric at 1 3/8" wide.
You will need enough strips to go all around your quilt (perimeter) just as you would in a regular binding technique.  Go ahead and sew these strips end to end to get the proper length.  I usually sew these on a diagonal to reduce bulk.

The next step will be to sew these two long strips together side by side.


I press this seam under the wider fabric.  I find that makes it smoother for attaching.

Continue the process by folding this strip in half and pressing firmly.  At this point I use a little spray starch to give a very sharp edge to the faux piping.  
This is very important:  Be careful that you are matching the edges of these two sides so that your piping is even.


Attaching this to your quilt is simple.  The difference from the usual attachment of a French fold binding is that this one is attached to the back of the quilt first.  This technique is a machine sewn binding on both back and front.

After attaching to the back of the quilt, bring the binding strip to the front being careful to keep everything straight.  You may choose to pin the binding to the front side.  My personal preference is to glue baste.  I learned this technique from Sharon Schamber     (www.sharonschamber.com) and it is the easiest way to work the mitered corners.

Stitch in the ditch next to the piping edge with a thread that matches the contrast fabric.  In my example, that thread color is silver to match my Kona Silver fabric.


Making the mitered corners is very smooth.  Just take your time and make sure that you get a good perpendicular fold at the corner to bring the fabric into place.


This is a great finishing technique for any quilt you do.  I am using this more and more on my quilts so I can get more quilts finished.


-sandi


Monday, November 9, 2015

VINTAGE QUILT REVIVAL

It all started when a few of my small group were having a mini retreat in one of our homes and one of the girls pulled out this quilting book.  


We discovered that it would take twenty blocks to make the sampler.  Our plan turned into making two blocks each month and have all blocks completed by October and then set together and quilted by Christmas.


So I decided to make mine in solids, Kona Solids in particular.  I pulled out bunches of fabric from my stash and set it aside to "shop" from each month.  I did not have to add any fabrics except the background that I chose.  I did not have enough Kona Snow so I ordered a bolt.  No, this project did not need a bolt, but I use this all the time. Now I have plenty to work with.


So each month I made a practice block out of prints to demonstrate the technique.

At the same time I was making my own blocks out of the solids.

My blocks were finished by October and today I finished putting my top together.  My choice was to set them on point.  Then I added setting triangles and that made it large enough for my bed.

I will take it to my long arm quilter and have it quilted and then add my binding and do the happy dance!!!  I think it will be ready for Christmas.

By the way, those extra "practice" blocks will show up in another blog to let you know how they were used.

                        -sandi


Thursday, October 8, 2015

MAKING HAND DYED FABRIC

Spending a day with quilty friends is always wonderful.  I did just that this week when we met at a friend's home and started dyeing fabrics.

The morning went so fast and we had dyed up everything we could find.

I put each color in its own baggie and took them home to sit overnight.


Then the rinsing began.  I rinsed and rinsed and rinsed by hand and finally put them in the washer and washed them in hot water and then into the dryer.


Aren't these just luscious colors?  I already have two or three projects in mind and started in my sketchbook to use these gems!

What a funderful day that was!!


                                             -sandi