http://www.themodernquiltguild.com/

Tuesday, May 29, 2012

MY SISTER

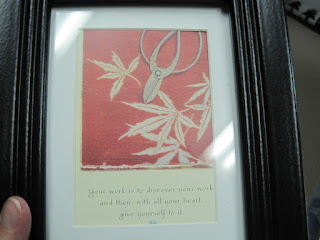
My sister gives me lots of neat gifts.  She sent me this card a few years ago and I took it apart and framed it for my studio.  It sums up how I feel about my art/quilting.


She came for a visit this weekend and once more brought me a cute gift.  These little yo-yos make the cutest push pins for my tack board.


Another neat gift was this framed puzzle with the cat and the quilts.  This cat looks like my KeeKee.


She had her friend, Cathy, cross stitch this beautiful piece for my studio.  Doesn't this just say it all?


I could continue showing my gifts but I want to tell you about our "Sisters' Weekend".
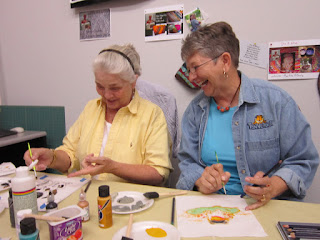
She arrived on Thursday in time to meet me for lunch.  Afterwards we had an afternoon of chatting before we headed out to my Greatful Threads Guild Meeting.  This is a guild of art quilters.  We thoroughly enjoyed all of the Show and Tell projects, but the real fun came when Denise offered the program.  We were invited to make a cute example of painting on fabric.  First, Denise showed us some examples and gave us some instruction on possible ways to do the project.  We were working on small squares of fabric.
Right here I need to point out that my sister is not a quilter.  Not a quilter of any kind!  She is a talented musician, writer, and composer.  She was a really good sport about going to this meeting and trying this project with me.
Now let the fun begin.  We chose our patterns and picked out our supplies.   Of course, Gigi chose a cat and I chose a frog.
This is Gigi getting the low-down.
Of course, we have to get tickled.  It is no fun if we aren't making fun of ourselves and each other as we demonstrate our "creativity".
Do you want to see what we have to show for the evening?  Get ready, here they come . . .
This is Gigi's cat, Tallulah! 


My frog, Croaker, on his lily pad.


No Sisters' Weekend is complete unless we do some shopping at the Antique stores and Architectural Exchange.
First a little browsing . . .
"It" has to be here somewhere.


Do you think this corbel will make a nice towel holder for my newly updated bath?

We found a few more things and moved on to check other places and other things.

Loved this pillow. . .

Had a great lunch at Niedlov's Bakery.

The rest of our visit was spent chatting and relaxing.  It was sad to see her leave, but there will be a next time. 

-sandi

Monday, May 21, 2012

HEXIE PROGRESS

I have made a little more progress on my Hexie project.


                                       -sandi

Sunday, May 20, 2012

ANTIQUE ALLEY YARD SALE 2012

Lots of people enjoy going to a neighborhood yard sale or chasing down yard sales in their part of town for a Saturday outing.  These are always fun and are usually the "leftovers" from some one's Spring cleaning or a downsize or just needing to "get rid of some stuff".  My husband and I have done our share of these sales too.

These days when the words "Yard Sale" are spoken at my house it means something entirely different. About 4 years ago, my DH decided he would like to do some Saturday Flea Markets around our area. These started out as small sales and now have grown into a very fun, busy Saturday Sale-a-Thon once or twice a month.  He loved doing it and meeting people so he started looking around for ways to collect "inventory".  It was impossible for us to have enough of our own stuff to re-sell.  He would go to Estate Sales and neighborhood yard sales looking for things he thought he could re-sell. 

After a couple of years he invited me to come along and help him a little.  He began to train me to be his "assistant yard seller".  Now I travel with him for the three major Yard Sales:  Highway 11 Antique Alley; Highway 41 Dixie Highway Sale; and Highway 127 Longest Yard Sale. He builds inventory year round and we load up our treasures and head out to the "BIG" sales.

This past weekend was the Highway 11 Antique Alley Sale and we had a spot in McDonald, TN located between Ooltewah and Cleveland, TN.

Here is what it looks like when we finally get unloaded and put all the "stuff" out onto the tables in the boxes.  This is when it looks like a big mess.
Then we separate it into categories on the tables.  

Housewares Department


Camping Supplies

Collectible Knick Knacks
Sporting Goods


Glassware and Bottles
Toys and Collectibles


More bottles


Now it is time to look around and see who our "neighbors" are.  Many of the vendors set up with the tents and their tables.
These two ladies had clothes and furniture among their wares.
 
 
Some vendors have special "selling" caps they wear no matter what the season.
 
The vendor on the left is our resident "electronics guru" with his wares.


DH is helping a customer choose the perfect guitar!

These three friends are enjoying their annual "road trip" to buy.
 
            We had good crowds, great weather, and lots of fun.

When it is over and done with, we must load up the tables and gather up the empty boxes and head home to get ready for the next time. 


One very tired DH who is happy with his weekend of Yard Selling!

                                                      -sandi


Monday, May 14, 2012

BINDING A QUILT

I have often been asked what stitch I use to bind my quilts.  I have always used what I called "the invisible hem stitch" because it does not show.  I have even used contrasting thread to bind and it never showed.


A couple of samples of bindings I have done on
recent quilts.


The folks over at Turning Twenty Blog have done a very nice tutorial on how this stitch is constructed.

The official name for it is THE INVISIBLE LADDER STITCH.

Check our their tutorial:

http://turningtwenty.com/tutorial-invisible-ladder-stitch-for-quilt-binding/

This will give your quilts a much better appearance and there is much less danger of the stitches ever pulling out.

                                                       -sandi

Sunday, May 13, 2012

Special Friend Gift

Thank you for the sweet blog (http.//sharon-dancingthruthreads.blogspot.com) about "our" quilt, Sharon.  You are a very dear friend of mine.


                                                          -sandi

Saturday, May 12, 2012

THIS IS A JOURNEY

A precious friend of mine has been diagnosed with non-Hodgkins Lymphoma, Stage 2-A.  She is currently taking chemo treatments.  Some days she feels okay and other days she feels really not okay.  After I saw her the other day, I could not get her off my mind. 

I must say that I am not a quilter who is always giving away my quilts.  Most of the time I make the quilt for the pleasure of the journey that I experience.

However, lately I find that I am being drawn to sharing my quilts with others.  So it is with my friend with Lymphoma.  It seemed that I must make her a quilt.

At our last SewDay when she was in my studio she commented about some "orphan" blocks that I had put on my design wall.  I was trying to decide how to use them.  I have long moved past their original plan. She commented that she liked those blocks.

When I finally accepted that I was supposed to make this quilt for her, I knew those blocks would be the starting point for me.


I only had a few of each of these.  I wanted to do something that would be clean and crisp.  Something not so traditional in design.

I took them to the design wall and started playing.  After a few tries I liked this one.  At least something like this.
I found a bolt of Kona cotton in Bone.  It was perfect for filling in the "negative space".  It would be crisp, clean and very soft looking.

Instead of cutting large pieces to put in long "sashing" style, I cut the pieces in irregular size blocks.  I thought this would give some interest to the overall design.

The top is pieced and ready for making the back.  I love pieced backs.
I had two more blocks that I did not use on the front and thought they would give me ideas for the backing.  I wanted to include my label as part of the back.
I used a print with a small rosebud on it as well as Kona Snow and the extra blocks and some leftover pieces from the blocks on the front. This back is pieced together with the label in the center block of the back.  I added more Kona Snow strips on each side to make the back wide enough.


Now it is ready to be loaded on the quilting machine and quilted out.

Wonderful!!!  It loaded without a hitch and I managed to get the back in the right direction so the writing on the label is not upside down.  Let the stitching begin . . .


AARRGGH!!!!!!!!!!!!
Something is not threaded correctly.  So I picked out all these stitches and re-threaded everything.  Whew!  It is now working and the bobbin stitching looks right.
I chose a Feather pattern.  This is Free Motion Quilting with a pantograph.  I still am learning.  I improve each time I do it, but I know it is more about the quilt and the love in this project than it is about perfection.


Another look at the quilting.  You can see the backing at the top of the picture as it is rolled over.

I have been trying to get this quilt to my friend, but she has had too many appointments, treatments, and days that she simply did not feel like having company.

She was able to come to Modern Quilt Guild meeting today and I could finally present her with her "Journey" quilt that was stitched with love especially for her. 


-sandi


Wednesday, May 2, 2012

SPRING WORKSHOP RETREAT


Workshops and Retreats are two things that most quilters really enjoy.  Recently a group of 5 friends decided to have a Workshop/Retreat and I was the teacher.
I chose a project to teach them a couple of new techniques.  They were going to learn to make Flying Geese blocks using Eleanor Burns' Flying Geese Ruler.  The other technique was to make prairie points and use them in the interior of the quilt as part of the border.
One of the gals found us the perfect location.  This is the clubhouse of PYC out at the lake.  Look at that blue sky.


Aren't these sailboats beautiful?
And our view from the work space.


The tables are set up and the extension cords are in place.  We are about ready to start.

Of course we needed to have our M&Ms for emergencies and our little thread catchers so we could be tidy and neat.

We brought our fabrics with some pre-cut to make our units.

We started making 4-Patch blocks.


Look at all the different combos of fabrics we chose.


First completed block
Three more to go

One of our buddies wasn't able to make it to the Workshop/Retreat.  We missed you, Linda!!

I want you to meet everyone else.
Phyllis at the cutting table.

Carol sewing borders.

Suzan adding sashing.

Sandy making her blocks.


Our view while we were eating lunch.  A tug pushing a load along.

This is not a very good picture because of the glare (and probably the photographer) but this is the deck where we ate our lunch.
This was such a peaceful, relaxing place to have our Workshop/Retreat.

The girls did not finish their tops at the Retreat and we will continue working on them at our regular Bee group meetings coming up.  I will post final pictures when we get the tops done.
Then we will do a Workshop on Quilting on our domestic machines using this project.

One of the things that the girls want me to do on the blog is add tips.  I always have tips on how to save time, be creative, or how to clean an iron.

The TIP for this time is about a tablecloth.  I suggest that each student bring an inexpensive flannel backed tablecloth to use for a design wall.  It helps in laying out the blocks. If you need to take them home to finish you can leave them on the cloth and nothing shifts.


                               -sandi