http://www.themodernquiltguild.com/

Saturday, December 28, 2013

PORCH CHATTER: IN THE PAST

I have had this watercolor painting of "Old Schoolhouse - Reliance, Tennessee on the Hiwassee River" painted by Nancy Fortune of Signal Mountain, Tennessee for over thirty years.
It has always had special significance for me because it is the building where my Mom went to school.
 
 
I have been back to the area several times and I always go by to see the building.
 
Today my hubby and I took a road trip up to Reliance, Tennessee to take a look at Spring Creek Retreat.  Of course, I had to stop to take a look at "Mom's school".
I took some photos.
This is the front of the building.  Two things were different:  a porch has been added and an information plaque on a stand.  The porch is okay, I guess, but it really did change the way the building looked to me.  I had never seen the building with the porch that had existed much earlier.
The *plaque explains that it was a church that was also used for the school for a while; that it was a meeting place where the Masonic order convened; and served as a place of worship.
 

This side view gives a better look at the pillars on which the building stands.
 
Here in this rear view you can better see the bell tower that the artist had placed in the front view in the watercolor.


This is the view of the two bridges over the Hiwassee River.  One to the west and the other toward the east.  The locals will tell you that this area flooded badly many times before the river was re-directed to better handle the heavy currents during rainy season.
It was such a fun trip today.  The weather was overcast and as I was finishing the photo snapping, the rain started.  It did not change the warm spot I felt in my heart.
I shared stories with my hubby on the way home that my mom told me about growing up in Polk County and the fun they all had swimming in the Greasy Creek.  Yep, that is a real place. 
Miss you, Mother!
 
-sandi
 

*  "Erected about 1899 through the joint effort of the Hiwassee Union Missionary Baptist Church and the local Masonic Lodge, this two-story, frame structure served as a multi-use community building.  The upper floor was for lodge meetings while the first floor served as the church meeting hall.  The first floor was also used as a schoolhouse for a brief time.
     Originally the first floor had a full front porch.  The porch was enclosed in 1927 when the church added two small meeting rooms, leaving a narrow entry way into the main hall.  The church and the lodge moved to new facilities less than a mile to the east on Highway 30.
     It was founded on October 8, 1848 as Hiwassee Union Baptist, and then in 1859 joined Sweetwater Baptist Association.  In 1861 the Ocoee Baptist Association was formed, so they asked to be released from Sweetwater's Association and joined the Ocoee Baptist Association.  Hiwassee Union Baptist went on to join Eastanallee Baptist Association in 1871, and finally it joined the Polk Baptist Association in 1921."


Friday, December 27, 2013

2014 PLANS

Another year is behind me and I am looking into the New Year of 2014.  About this time each year I begin to look at the unfinished projects that are stacked in my studio.  I have also made a list of them.  Last year I attempted to complete one a month.  That was interrupted when I took on a part-time project/job for the year.  That project is almost completed and I am looking forward to more time to work on my personal projects this year.

Another thing that I want to do is use up my stash.  I have joined some of my other quilty friends to make a pledge (well, sort of) not to buy any more fabric unless it is necessary for the completion of a project.  Hmmm, we shall see if I keep this promise/pledge to myself. 

Here are a few of the projects that come to mind:


Farmer's Market


Batik Kaleidoscope


Small Landscape


I have no idea in what order I will do these projects as well as many others. 
So, let's get started!!  I will try to post a little more often with progress reports this year.
 
HAPPY NEW YEAR 2014!!!
 
-sandi


Thursday, December 19, 2013

YEAR IN REVIEW


2013 was a very busy year for me.  Early in the year I made a couple thank you quilts for friends who helped with my husband's surgery recovery.

I made two of these.  They are called Friendship Star and came from Karen Combs pattern.
Challenge blocks for Chattanooga Modern Quilt Guild Banner.


"Janus" is my version of a
pattern called Deep Breath by Weeks Ringle and Bill Kerr.
"Tree of Life"
"My Little House"
Silk Scarf

Ten Degree Ruler Workshop
"Doorways"

Special Request Quilt for Nick
Floor Quilt with Buddies

Birthday Quilt


Ticker Tape Quilt-As-You-Go
Improv block for a cushion

Another Birthday Quilt, my version of a Gee's Bend quilt pattern called "Rooftop".

Modern Mini Swap

Tiny Pin Cushions

Birthday Quilt from an Eleanor Burns pattern called "Hole in the Wall".


There were more quilts and projects made during 2013 but I did not get photos of them.  Maybe I will do better in 2014.

I have so much planned already for 2014.  It will be great fun getting some of my ideas out of my head and completed at my sewing machine.

Please stop by off and on in the upcoming year.  I promise to bring you some new projects.

                                         -sandi


Wednesday, December 11, 2013

HAPPY BIRTHDAY IN DECEMBER

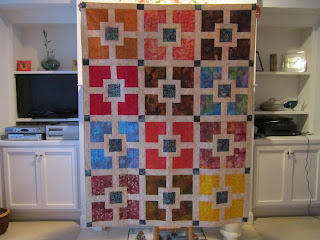
Another quilt finished for one of my sweet friends.  Her birthday is in December.

This is an Eleanor Burns pattern and I used all Batiks.  I like the clear, crisp lines it has.  It is called "Hole in the Wall" designed by Sue Bouchard of Quilt in a Day.
I changed the cornerstones to a fabric that was similar to the block centers for added interest.  In the original pattern, the cornerstones were the same fabric as the sashing.


This is the back of the quilt using up most of the scraps.

I really like this label that I am using.  It is simple and basic.

A personal size quilt for a special person!  Happy Birthday, Phyllis!!


                                              -sandi

Friday, December 6, 2013

GIFT BAG

I needed to wrap a gift and I was sure that I had an extra Christmas gift bag left over from last year.  Each bag I checked was either too small or way too large.

It is pouring rain and a real mess outside, so I decided not to go shopping.  I started looking for some fabric scraps to make my own version of a Christmas gift bag.

I found this cute Christmas fabric with holly and red berries for the bag.  Then I went to my solids drawers and found some solid red fabric for the lining.

I cut two pieces of each fabric.  In my sample I cut 14 inch squares.  You could change the size of this to fit whatever you want to wrap.

The first step was to sew the outside squares of the bag together and also sew the two squares of  lining of the bag together.  Sew around three sides.  I used a quarter inch seam but shortened my stitch length a little bit.  Leaving the top of the bags open will allow you to nest them later.  Also, it is important to leave a small opening at the bottom of the lining.


This little ruler is one of the handiest tools I own.  It is made by Perkins Dry Goods and is designed to help you get a true quarter inch seam.  I use it for many other things too.
 
In this project I am using it to draw a one inch square in all the corners. 
 
 
This will help me form the gusset to get the shape of my bag.
 

By forming a triangle with the corner you now have a line to stitch on.

Now I have two bags with corner gussets sewn in.

The next step is where you put the lining of the bag inside the outside bag right sides together.  I inserted the handle between the lining and the outside making sure that it was well out of the way of the stitching line.

I sewed a quarter inch seam across the top of the bag all the way around.
Now it is time to turn the bag right side out.  This is where that section at the bottom of the lining that was left open comes in handy.


Pull the outside bag through the opening and smooth it out making sure that the lining corners nestle into the corners of the outside bag.


Use a very narrow seam to sew the opening in the lining bottom closed.


Two rows of top stitching will finish off the bag.

I did not use any batting or interfacing because this is a gift bag.  If you want a sturdier bag you could have used batting or fusible interfacing.

My gift bag is finished and already filled with a special gift for someone.

                                           -sandi