http://www.themodernquiltguild.com/

Thursday, August 29, 2013

AQS QUILT WEEK-CHALLENGE

 
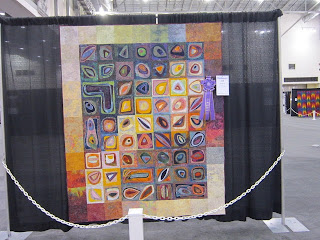
These are a few of the quilts I saw at the AQS Show in Grand Rapids.
 
 The first ones are from the Ultimate Guild Challenge Division.


Insomnia in the City


Hyatt Regency, Houston 2012


Under the Influence of


Bright Night at the Castle
 

Coke Plant Terrazzo


Fractured Skyline

Dawn

The Louvre
 

Insomnia in the City


Sushi III by Mary Kay Price


The category is Made by Machine.


This one is from Wall Quilts -- Machine Quilted


Escuchame by Beth Markel
 
 
From Wall-Quilts  --  Hand Quilted

Six Fifteen by Tina McCann


Bandelier National Monument by Ann Horton


These were a few of my favorites.  More to come later.


                                   -sandi

Tuesday, August 27, 2013

ANOTHER YARD SALE FIND

My hubby is always going to yard sales and estate sales.  He brings home some very interesting things from time to time.

This week he came home with this big plastic bag with "some kind of quilting stuff"  in it.

It sat on the chair for a few days until I had time to really open it up and inspect it.

There were these motifs that probably came as a panel.
It is from Cranston Print Works Co. and called "Picture Book Patches".


Included are pre-cut squares of batting and backing fabric.
Sashing fabric . . .


These little squares cut apart. . .
There are several blocks already sandwiched together.  It is a polyester batting and the maker is using two layers of batting and then a backing.


These are hand quilted in a Quilt As You Go style.  I think they are really interesting and my guess is they are from the 80s.

A quilter who didn't get her project finished . . .

This will be a package that we re-sell. 

It is fun to see these things and get to guess what the quilt maker had in mind.

                                  -sandi


Monday, August 26, 2013

HIDDEN WELLS

is a pattern designed by the late Mary Ellen Hopkins.  It is a great play on secondary patterns.

I made my first one at the first quilt retreat I attended many years ago.  After that I made several more because I was intrigued with the pattern.

I just came across these two pictures and wanted to share them.

The fabrics for this one are inspired from the black focus fabric.  I think the quilt center appears to have triple layers of depth because of the extra wide borders.  The pale green fabric lets those blocks float a little in the overall design of the quilt.

The next one is very different.

It is a little messier looking.  The floral/fruit focus fabric does not make the secondary blocks show up with clarity.

It is always interesting for me to go back and look at some of my older creations and then to analyze the design principles.  Sometimes I have blurred the lines of good design.  This piece clearly forces the eye to focus on the primary design blocks.

My current work is less fussy and getting to be more minimalist with very clean lines.

This piece has a certain degree of depth, but very strong negative space.  There is little to no secondary pattern developing in this piece.


                                         -sandi

P.S.  You might enjoy this older blog post.  http://frogpondstudio.blogspot.com/2013/04/where-does-this-path-go.html


Saturday, August 24, 2013

PEANUT BUTTER PIE

The first time that I invited my soon-to-be husband to dinner, I created my version of a Peanut Butter Pie.  I had never even heard of a pie by that name before.  I just needed a dessert and these were the ingredients I had on hand.  So I made this dessert and he thought it was the best thing he had ever eaten.  About ten years after we were married, he asked me if I thought I would ever make another Peanut Butter Pie for him?  "Well", I said, "I already won you over, why should I do it again?"  Actually, I never thought it was such a big deal, but, obviously he did.  Now I make it every few years or so just to keep him happier.

First, a pie shell.  Now you must have a fresh, homemade pie crust.  You don't make homemade pie crust?!?!  Oh, well, just run down to the market and pick out the best looking deep dish frozen pie shell you can find and then just fib that it is homemade.

Okay, now that we have that settled.  Take that pie crust and do a blind bake.  Huh??  What's that blind bake stuff??  Well, just take a fork and prick some holes in the bottom of that cutie and pop it in the oven and bake it until it is brown.  If you have to know exactly how long, you can look it up on the package wrapper.
After it has baked, let it cool for about 10 minutes.  Now pay attention to this time because you want the crust to still be almost hot, that is, extra warm.
The next ingredient is peanut butter.  I don't really care if you use creamy or crunchy.  At my house, it will always be crunchy because that is just what we like.  Besides, it makes it have another texture and you know those chef-types are always talking about texture in food being important.


You are now going to paint the bottom and halfway up the sides of the baked (still extra warm) pie shell with the peanut butter.  The brush I use is a case knife.  How much peanut butter, you ask?  Well, that depends on how much you like peanut butter.  Use enough to have a good coating that is about a quarter inch or so thick.  You may make it thicker if you really like the taste of peanut butter.

Now it looks like this:


Let this cool completely.  Wait until it is cool, then make your "from scratch pudding" for the filling.  What do you mean you have never made pudding from scratch???  Okay, just go to the pantry and find that box of your favorite brand of Instant Chocolate Pudding and add the proper amount of milk and whisk it up into a pie filling.  Make sure that milk is very cold and that it has some butter fat in it.  That skim milk stuff won't work this time!


Pour this filling into your coated pie shell and refrigerate for a few hours.  Overnight is okay, too.


Immediately before serving add your whipped topping.  Okay, you can use that kind out of the plastic tub.  I don't think the aerosol can stuff works as well.


Serve to your guests and try to act humble when you get more compliments than you have had in a long, long time on your cooking.

This little pie is going to a party tonight!!  Our friends are celebrating their wedding anniversary and this will be my contribution to the dessert table.

                                         -sandi

Friday, August 23, 2013

LADY AUBERGINE QAYG

This is Lady Aubergine and I named this quilt after her.  Isn't she awesome?

Well, I certainly put this off long enough.  Sometimes, I think I would be better off if I could not read so well.  Each time I read someone's blog about Quilt As You Go technique I was sure they were leaving out something.  I finally decided to jump in and try it this weekend.  It is important to credit  http://thequiltingedge.blogspot.com for her wonderful tutorial. 

I had these cute ticker tape blocks made and they were just begging for QAYG.  They are raw edge applique in the rainbow solids.  I used Kona cottons and dug through my stash to find all of the little pieces to make each block.  I first wrote about these on April 1 along with other WIPs that I wanted to finish at Retreats this year.  I have not made as much progress in that realm as I would have liked.  I kept doing new things. 


The quilting on each block is straight line -- well mostly straight line.  I took the "organic" approach and let them wander a little bit.
 
After all of these were made, I decided to lay them out.  I changed my mind several times and chose to ignore some of the predictable ways to group them.
 
They are grouped to please me.
 
Now to join them together to make the quilt.
 
I cut my front sashing strips at 4.5" and folded them in half and pressed.  The stripe fabric is the backing sashing and it is cut at 2.5" and the batting strips are cut at 1.5". 


The first step was attaching the front sashing and the back sashing at the same time.


Then I used glue for basting the back sashing to sew it to the other side of the adjoining block.
 
 
As you can see with the block on the right, the two sashings are now in place.
 
 
The back sashing shows the batting sticking out and that the sashing has been quilted.


Everything has been quilted and it is ready for the binding.
I chose to put no outside borders on this piece.
 
 
Lil Bit is comparing the color of her tennis ball with one of the blocks on the quilt.
 
 
 Here is the back of the quilt and you can better see the quilting and I used this fun stripey fabric for sashing on the back.
 
A shot of the whole back of the quilt.  I like the funky look of that stripe fabric.
 
 
Love having this on my swing and it goes perfectly with my new gift pillow of the dragonfly that my sister gave me.
Why don't you come over and join me for a spell?  We could have  a glass of wine and sit and visit on my porch!!
 
Credit:  Rachel at http://www.stitchedincolor.com/ for the idea of the Rainbow blocks.


-sandi