http://www.themodernquiltguild.com/
Showing posts with label Friendship Star Quilt. Show all posts

Monday, February 23, 2015

PORCH CHATTER: FEELING BLESSED

It is not everyday that I am given the opportunity to give someone a quilt because they truly need a quilt.  But today that happened!

Our friends lost their home to fire a few months ago and nothing was salvageable.  They spent several weeks living in their motor home until they were able to find a home to rent. Everything in the home is rented and has no personal meaning for them. They are so thankful that no one was injured in the fire but all of their quilts and bedding were ruined by water and smoke/fire damage.  All of their furnishings  were ruined/destroyed.  

Today I had the pleasure of sharing a quilt with them for their bed.  


A Friendship Star quilt for these special folks and their dog, Max!!

I am feeling so blessed to give them something that they need and love!  Thank you, Libby and Charles, for appreciating my quilt!!  


I think this looks perfect on their bed!!


                                         -sandi

Sunday, February 9, 2014

WEEKLY UPDATE

My weekly update for projects includes finishing two Improv blocks and getting them quilted together for my QAYG project.  There are seven more to go.

 
I pieced the top for this quilt in 2012 and have just had it quilted by Gayle Grier at A Quilter's Playhouse.  I love that it has no borders.
 
The red fabric I used for the back of the Friendship Star was so interesting to me.  I just loved it!!  I used leftovers to do my back and to write my label.

This was not one of the projects on the  Proposals post, but it just surfaced and I was able to finish it.

I also started working on a scarf with the wonderful Cascade yarn that my friend, Laura, sent to me.

Okay, that is one week's worth of work.  Hope this next week brings me more time to work on my projects.

                                   -sandi


Wednesday, November 13, 2013

NOVEMBER MUSINGS

November has arrived and I am greatly behind with lots of my sewing.  Lil Bit and I are going to have to get off our heating pad and the iPad and get to sewing!!


Okay here are some things that I need to get completed this month.

These little pincushions are nice little favors to add to any gift that you might be giving.
They use little snippets of fabric.  I am stuffing them with steel wool and batting.  The steel wool helps to keep pins sharpened.
Paper piecing is the technique.


Still hand quilting this little piece.  It is a Christmas gift.


This quilt uses the pattern Lawn Chair Quilts from Moda Bake Shop and is another Christmas gift.  I love using the grey as the neutral.


Here is another quilt that needs to be quilted and bound for a special Christmas gift to someone very important to me.
And the last piece I am working on for a December deadline is this cute little quilt.  Well, these are some of the blocks for a cute little quilt.

I think this is enough to keep me busy for the next 3 or 4 weeks.  I will keep you posted as I progress!

Enjoy your holiday season!

                                               -sandi


Friday, November 16, 2012

IS THIS A SERIES?


In general, I do not make the same quilt pattern repeatedly.  However, this is my fourth Friendship Star Quilt.
The only other time that I have made multiple quilts from the same pattern was when I was teaching Beginning Level Quilting Classes. 
The pattern I chose to use was the Log Cabin and I ended up with several of these.  Each time I would teach the class I would think of another set of fabrics that I thought would look wonderful in that pattern.  Of course, the Log Cabin is another example of a value study quilt.  Each block is composed of a light side and a dark side.

The first Friendship Star Quilt I made was for a Value Play Workshop Retreat that I taught a few years ago.
This quilt was scrappy and I added a rather traditional border to it to give it a finished look. 
I loved this pattern and decided I wanted to make another one someday.


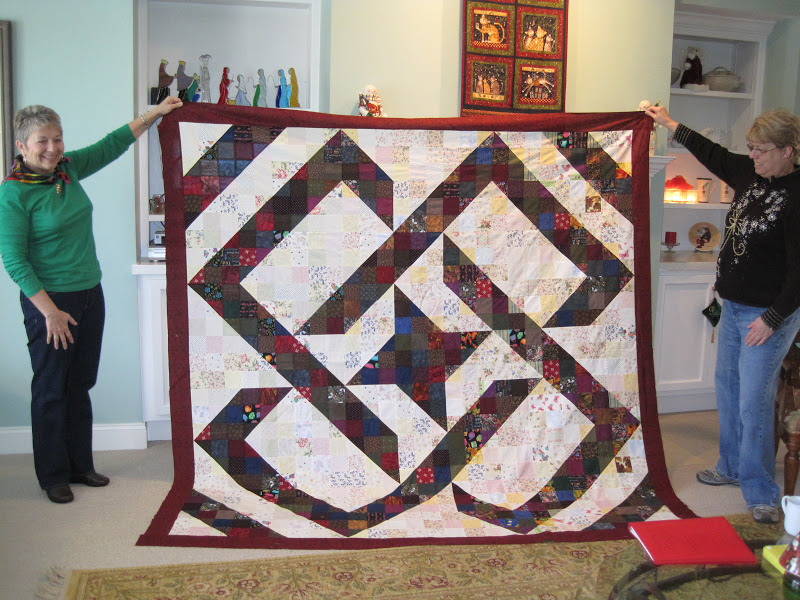
Recently my sister asked me to make a quilt for her to use as a gift for her son for Christmas.  This was the perfect opportunity to make a Friendship Star Quilt where I could use lots of scraps.  I wanted it to have a modern look so I omitted the borders. 


I also made another one.  When my daughter saw it she love it.  This one has fabrics in it that she remembers from other projects I have made over the years.  This is what is so special about scrappy quilts.  They often bring back wonderful memories.


Then I wanted to make a quilt as a thank you for a friend of ours who has been so helpful during my husband's hip replacement surgeries.  In this one I chose mostly browns and blues. 
Friendship Star seemed like the obvious pattern. 

Of course, now that I am on number four, it seems like a series.

  I laid out the blocks and carefully labeled them so that they would all go together in the proper arrangement.  Look closely and you will see that I turned one of the blocks the wrong way. 
I could tell you that that is a "design alternative" or that it is a "humility block".  But the truth is I made a mistake and I am not going to re-do this quilt. I did not see this until after the quilt was quilted and bound and posted to Facebook. 

 Oh, well, I know that our friend will enjoy this quilt and it will keep him warm even with one block that is turned wrong.  A life lesson I have learned is that perfection is not my goal.  Enjoying the journey and sharing my passion is.

This quilt made me smile and I think that it will make others happy.
I have made enough quilts using this pattern now.  My next quilts will use some other pattern.  Stop back by to see some of my other ideas.

                                          -sandi


Wednesday, October 24, 2012

A DAY OF CUTTING AND SEWING

I spent today cutting about 500 three inch squares in lights and darks.


Then I cut some 3.5" strips to make about 200 Half-Square Triangles.

I used my EZ Angle Ruler to cut the half-square triangles.


Here is my basket full of HSTs ready to be pressed.

Tomorrow I will make Split 9-Patch blocks and get started on another Friendship Star Quilt.

This is what Lil Bit did!


She sat in her bed chewing on her Chew Bone with her little "doggy"  toy.

Our day was busy and productive.

                                                     -sandi

Wednesday, August 22, 2012

GOING SCRAPPY

Last weekend I went to the Grand Oak Retreat Center in Scottsboro, Alabama for four wonderful, fun-filled days of sewing and creating.

There were ladies from Tennessee, Georgia, Alabama, Louisiana and Mississippi working on quilting.  We did have a lady from Alabama who was a scrapbooker.  She did some beautiful alphabet pages for a gift for a friend's Christmas.

Look at this beautiful view overlooking the Tennessee River.  We gathered on this porch most mornings to have our first cup of coffee, tea, or soda.
This was our workroom.  There were fourteen of us having a ball.

All of us worked on our individual projects.  I took a project with me that was very scrappy -- anything goes kind of scrappy.  I was working with split-nine-patch blocks with a few regular 9-patch blocks thrown in.

I spent two days before retreat cutting out several hundred squares and making a large number of half-square triangles so I could start right into sewing. 


I lined up everything on my sewing machine table and started making my blocks.


This is what it looked like under my machine as I chain pieced the nine-patch blocks together.


This was my finished top.  I love the friendship star in the center.  I don't think I will add any borders.  It looks more interesting without a border.

Now on to doing the back and binding it.  Looking at the drawer of left-over bindings and thinking I might could use some of them. 

 This is the second one of this pattern that I have made and each one looks a little different.  I really do like it!!!!


                                              -sandi


Wednesday, July 18, 2012

TIP OF THE DAY


CLEANING THE IRON


I am sure your iron never looks like this. 


But, since I am fond of using spray starch for my fabric, this happens to my iron on a regular basis.

 My mom always used a sheet of waxed paper with table salt poured on it to clean her iron.  I did that when I first started housekeeping.  Sometimes it worked very well, other times not so well.  Over the years I have tried numerous products and tips to clean my iron with varying degrees of success.

Along the way someone told me about Mr. Clean Magic Erasers for cleaning the iron.  I use these all the time to clean my showers, etc. in the bathrooms.  Now I use them in my studio to clean my irons.


 Begin by saturating the sponge with water.  I have mine so wet it is dripping water.  Place it on a folded hand towel and take it to the ironing board.
Heat the iron to the highest temperature setting.  Now iron over the wet sponge.  Do this as long as there is any residue on the sole plate.  Turn the sponge over and do a little more ironing on this side.
When you have finished cleaning the iron, the sponge will look something like this
and your iron will look like this.


It is probably a good idea to take a few minutes regularly to clean your iron this way.  I try to do this often enough that the buildup is minimal and it only requires a little time and effort.

                                       -sandi